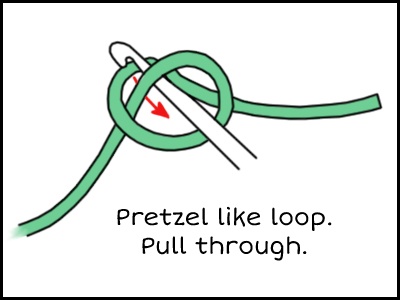
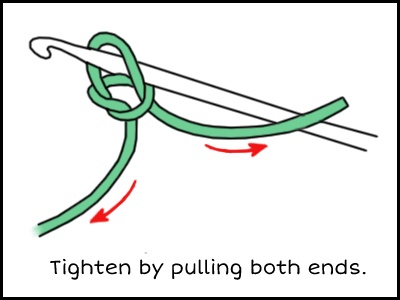
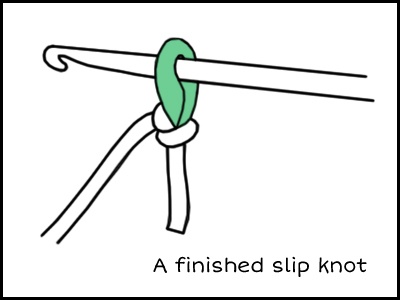
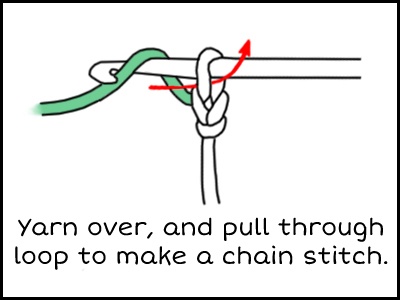
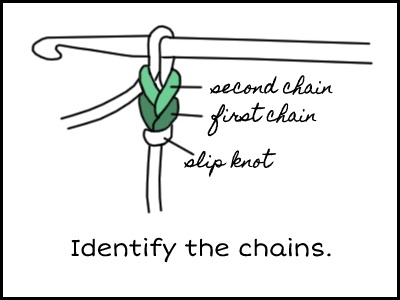
Yarn Overs and Pull Throughs

Hope you don’t mind the phrase “Yarn over…. and pull through…” because you’re going to be hearing, reading, and repeating it to yourself an awful lot through these lessons. If you’ve been following along so far you’ve got your hook and you’ve got your light-colored worsted weight yarn – the material of your choice.

Still not convinced to use a lighter color? As a person that adores my darker colors, when I wanted to learn to crochet I wanted a glorious dark gray for my very first scarf. I bought a skein of the perfect dark shade and thought I would just learn as I made my scarf. I failed almost immediately. My stitches didn’t line up; I was “off count” each row. My scarf was losing stitches every row I finished. Frustrated, I realized how hard it was for me to see each stitch clearly. Back to the store I went, I picked out an ugly light brown, and well.. here I am today.  The lighter color isn’t a fashion statement, it’s merely to help you distinguish each stitch until you finish learning and can dive into all those pretty yarns you’ve been drooling over at the store.

The Slip Knot

Begin by making a slip knot. Pull about 6 inches of yarn out from your skein. Create a loop that looks almost like a pretzel. Insert your hook through the center of the loop and pull the working end (the end connected to the skein) through. Pull gently on both ends of the yarn to tighten slightly. A common mistake among new crocheters is crocheting too tightly. You want to make sure the slip knot can easily slide back and forth.

You’re never going to get a pattern that says to create a slip knot. It’s an unspoken, given, start. If you see a pattern that begins with chain stitches, you obviously must create a slip knot first in order to begin.

Creating the Chain Stitch

Chain stitches are the foundation of most things you’ll crochet. This is your first official stitch. Once you have your slip knot on your hook, yarn over (wrap the yarn over your hook). Pull through (pull the yarn through the loop on our hook). Congrats! You’ve just made your first stitch! Continue to yarn over and pull through to create more chains.

In the second picture, you’ll see a set of 2 chains. Look at your chain, recognize them. Each chain creates a V shape. Count how many chains you’ve made. Regardless of what stitch you are making, never count the loop on your hook.

Abbreviations

US:  ch
UK:  ch
ex: ch9 = 9 chain stitches (we’ll go into more detail in a later lesson)

Homework

Homework

Practice making slip knots. Over and over again. I want you to reach a point where you don’t have to think about making one, you just make it.

Chains! Chains! Chains! Practice your chains until you get uniform sizes across all your chains. Make sure you’re sizing your chains by sliding up and down the hook, the shaft specifically, where sizes are measured.

Quiz

Count how many chain stitches are in this picture:

True or False: When creating a chain stitch chain, you always need to make sure you count the loop on your hook. If you don’t you’ll be missing a stitch!

What does the term “yarn over” mean?

A – Pull the yarn over your hook.

B – It refers to the loop on your hook!

C – It just means there’s yarn on your hook.

What does the phrase “pull through” mean?

A – Pull the yarn over the hook.

B – Pull yarn under the hook.

C – Pull the yarn through the loop on your hook.

There are six stitches! Never count the loop on your hook as a stitch!

False! Never count the loop on your hook as a stitch!

A

“Yarn Over” means to wrap the yarn over your hook!

C

“Pull Through” means to pull the yarn through the loop on your hook!